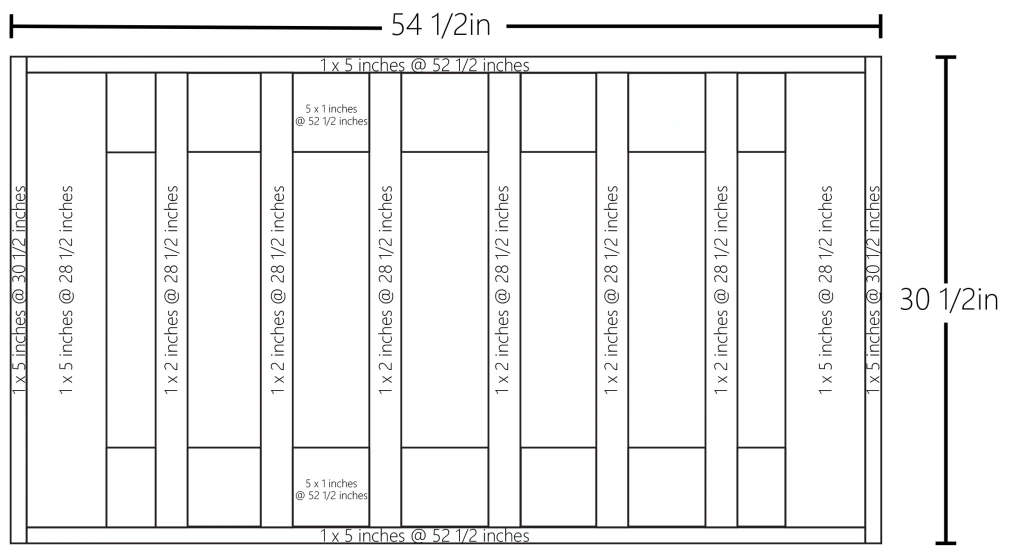
(2) 1×5 poplar wood @ 30 1/2in-measure and cut to fit
(4) 1×5 poplar wood @ 52 1/2in-measure and cut to fit
(2) 1×5 poplar wood @ 28 1/2in-measure and cut to fit
(6) 1×2 poplar wood @ 28 1/2in-measure and cut to fit
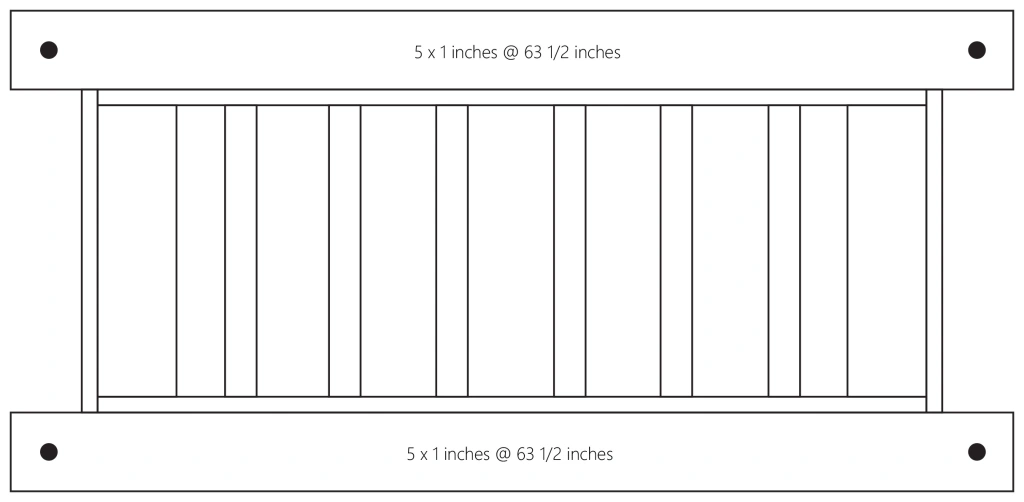
(2) 1×5 poplar wood @ 63 1/2-measure and cut to fit
(2) 1×2 poplar wood @ 18in-measure and cut to fit
(2) 1×3 poplar wood @ 19in-measure and cut to fit
(2) 1×2 poplar wood @ 24in-measure and cut to fit
(3) 1×3 poplar wood @ 25in-measure and cut to fit
(4) 1×2 poplar wood @ 30 1/2in-measure and cut to fit
(2) 1×3 poplar wood @ 32 1/2in-measure and cut to fit
(3) 1×2 poplar wood @ 52 1/2in-measure and cut to fit
(1) 1×3 poplar wood @ 57 1/2-measure and cut to fit
Tools & Materials
Wood Filler
Wood Glue
Measuring Tape
Electric Sander (optional)
120 or 220 grit Sandpaper
Table Saw
Miter Saw
Drill
2 1/2in Kreg Jig Screws
Kreg Jig R3 kit and clamp
Kreg Jig Wood Plugs
Finish Nail Gun
1 1/2in Finish Nails
1 1/4in Finish Nails
1in Finish Nails
1in Whole Saw
Jigsaw (optional)
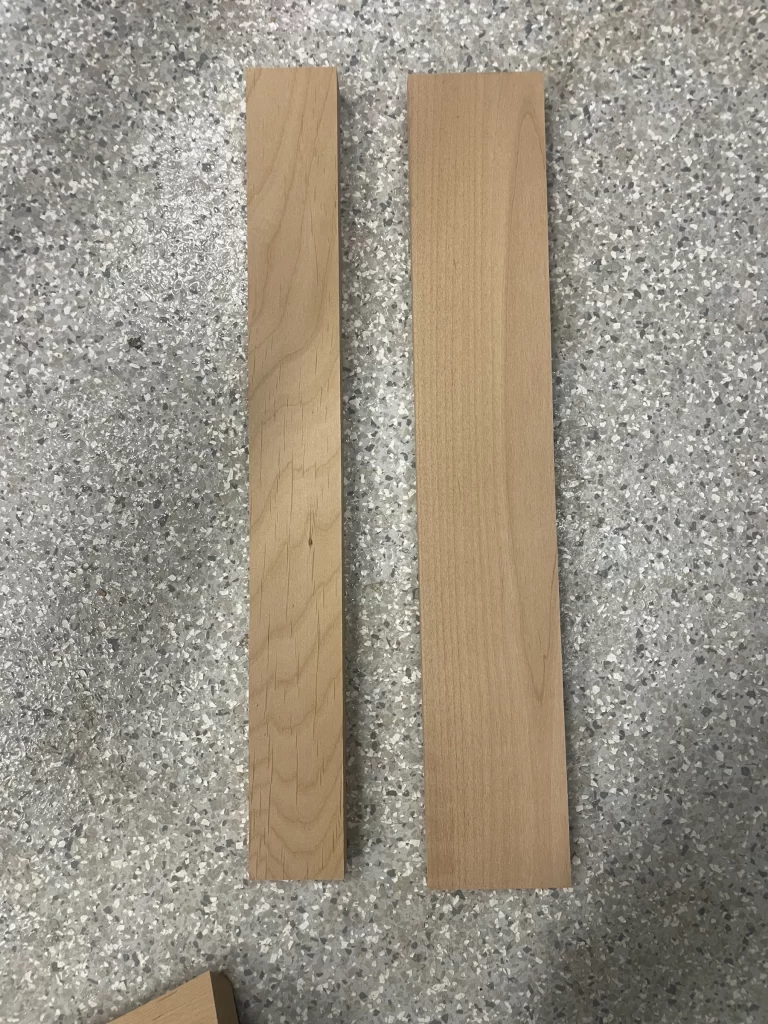
Before I jump into this tutorial for the porch swing. I just wanted to let you know that usually with dimensional lumber (for example: like a 2x4x8ft). It isn’t true to it’s measurements. (for example: 2x4x8ft is really 1 1/2in x 3 1/2in x 8ft).
In this tutorial, we used a true 1inch board from a lumber store in Las Vegas, NV called Peterman’s Lumber. So when I am explaining the steps, I’ll go by what we used but you can use adjust the measurements to what you have. I wouldn’t recommend 2×4’s or 2×6’s because they would be too bulky and heavy for this project so if anything use 1×4’s or 1×6’s.
How to make
Step 1:
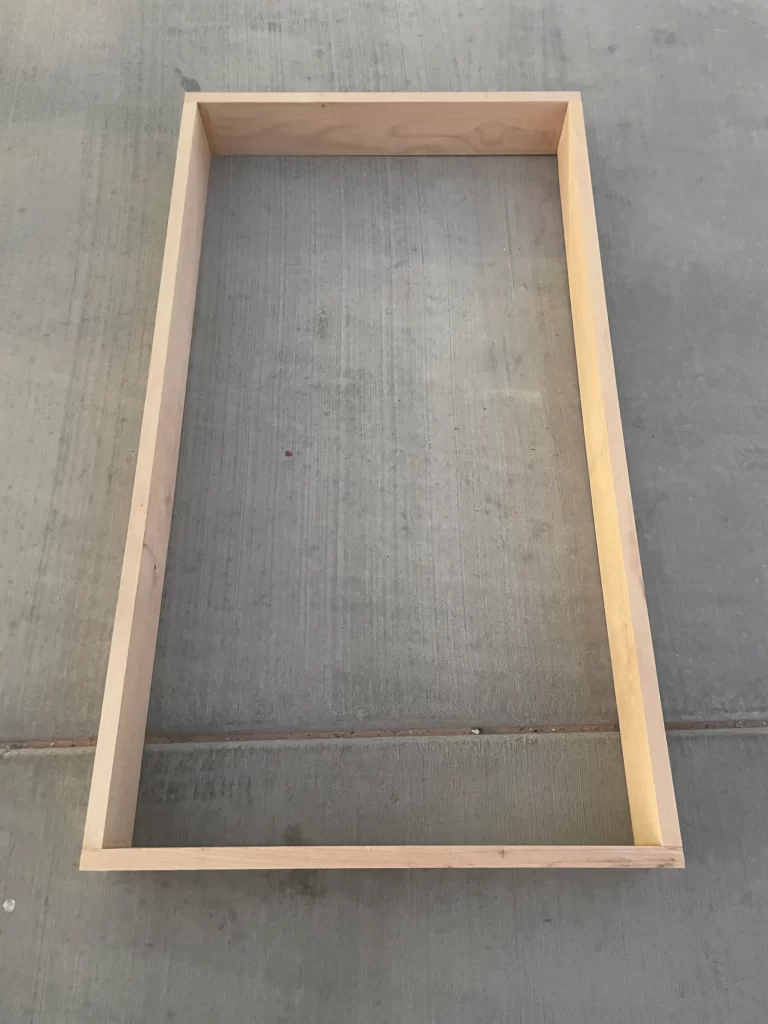
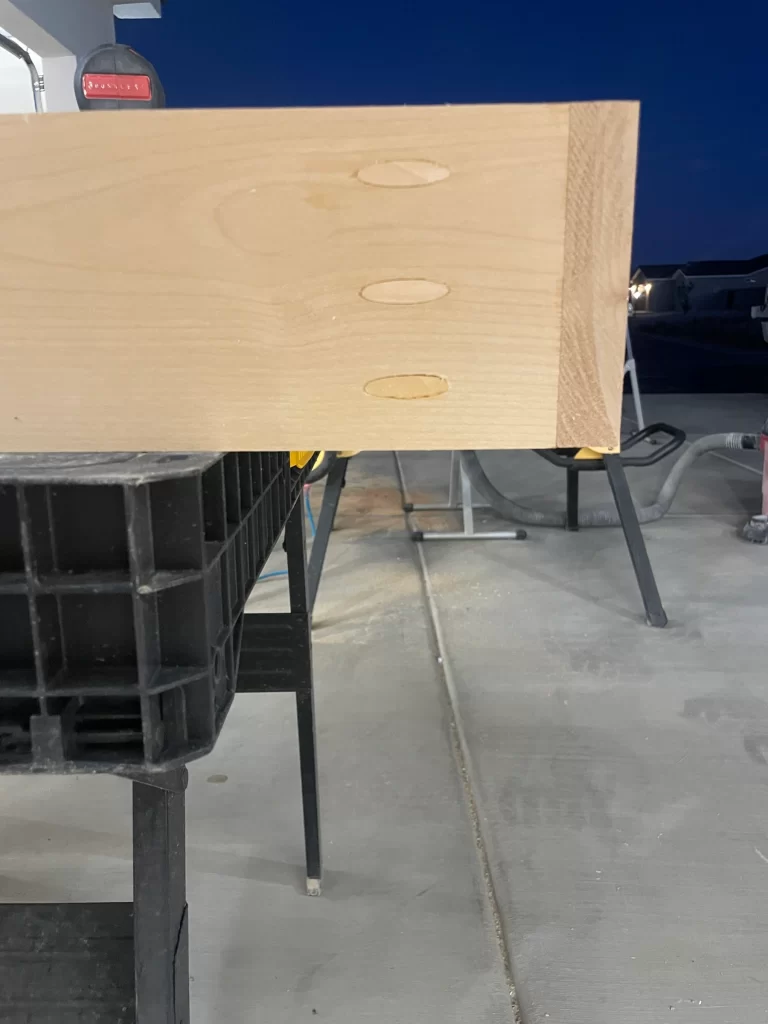
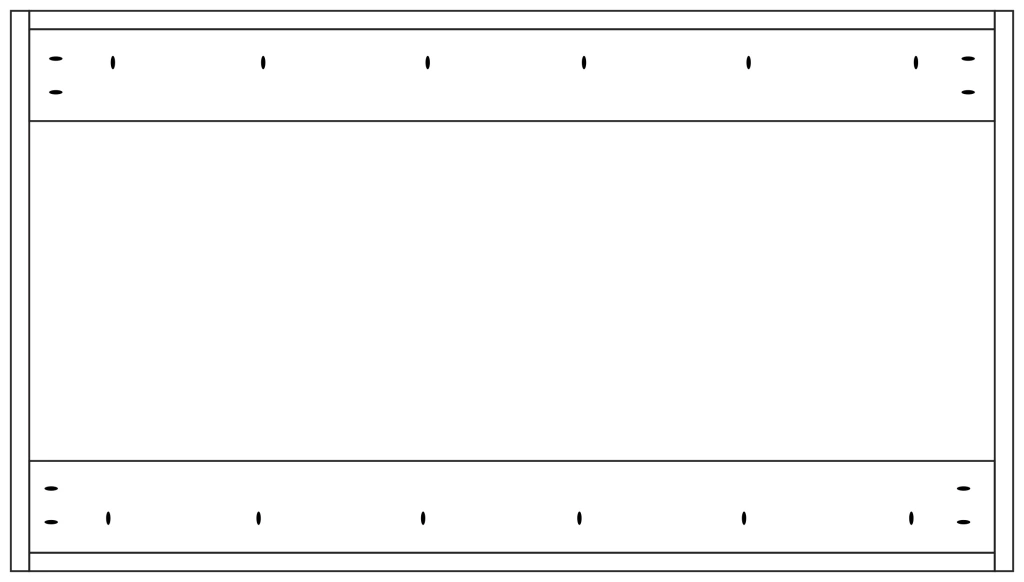
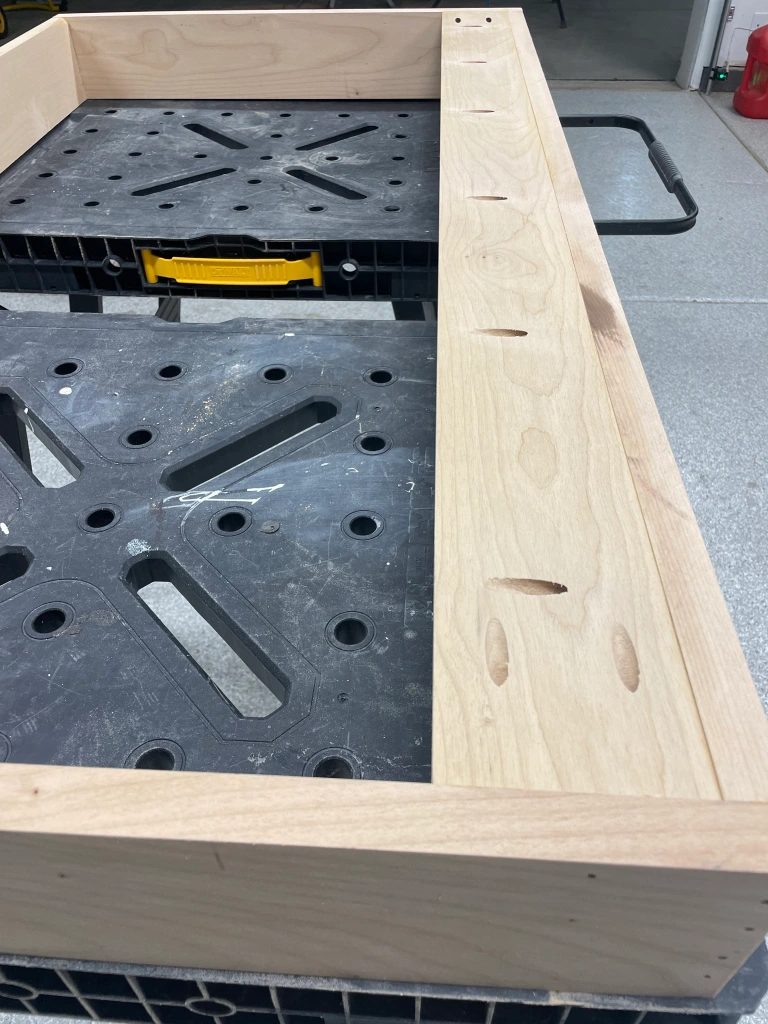
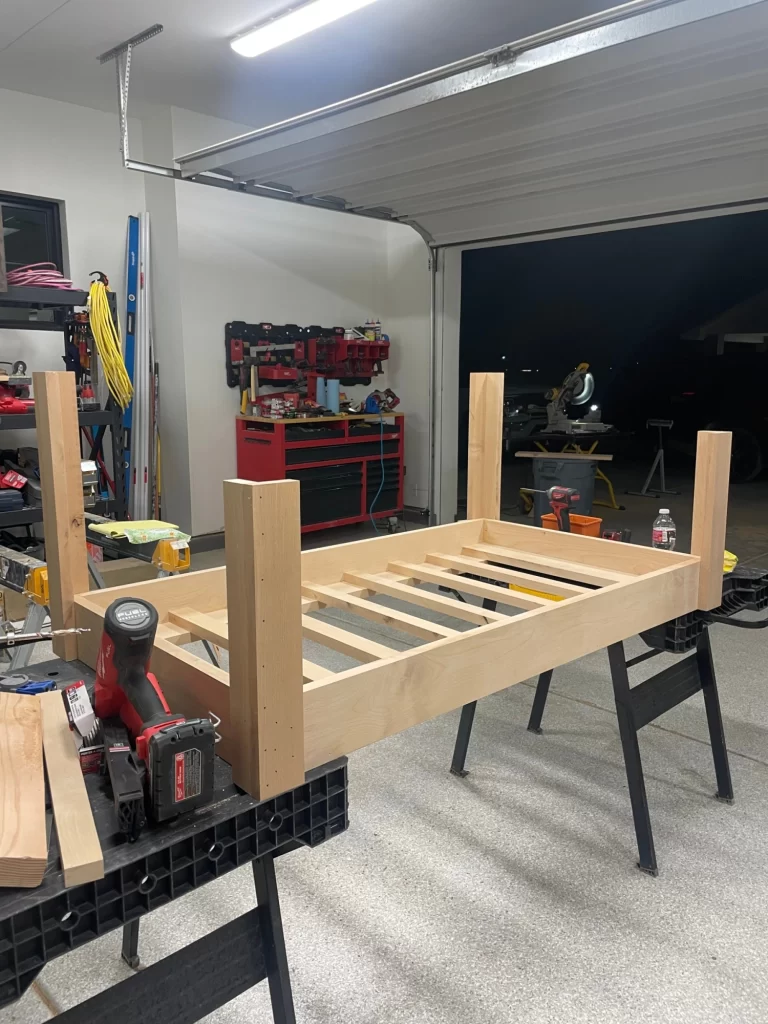
You want to start with putting your seat frame together first with your (2) 1×5@30 1/2in and (2) 1×5@52 1/2in pieces. Once you have your pieces ready, we added 2 1/2in pocket holes with the Kreg jig to put the boards together. We did 3 screws on each side (just like the picture and covered with wood plugs) on the outer side of the frame.
***Don’t forget the wood glue every time you put two pieces of wood together.
Step 2:
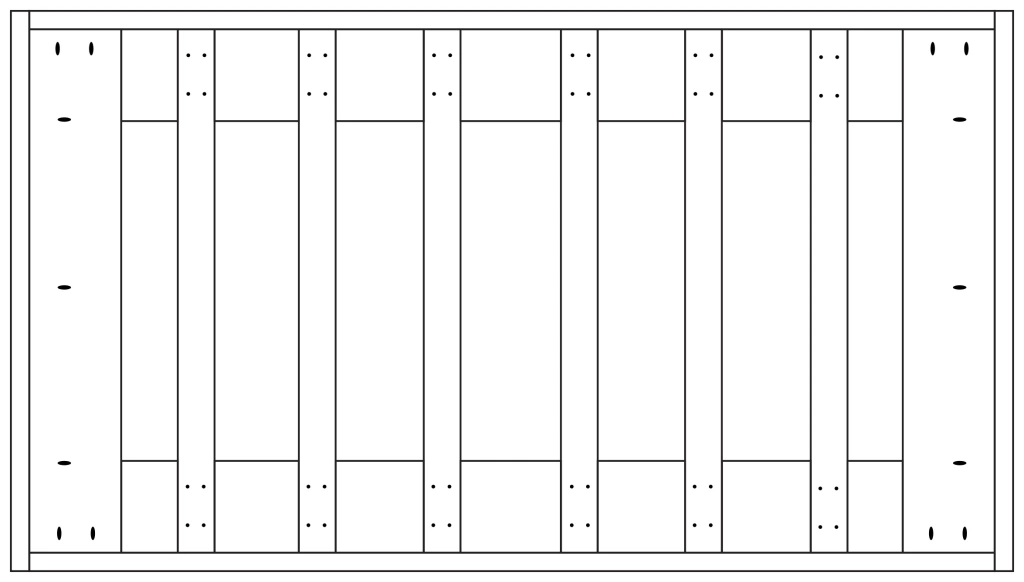
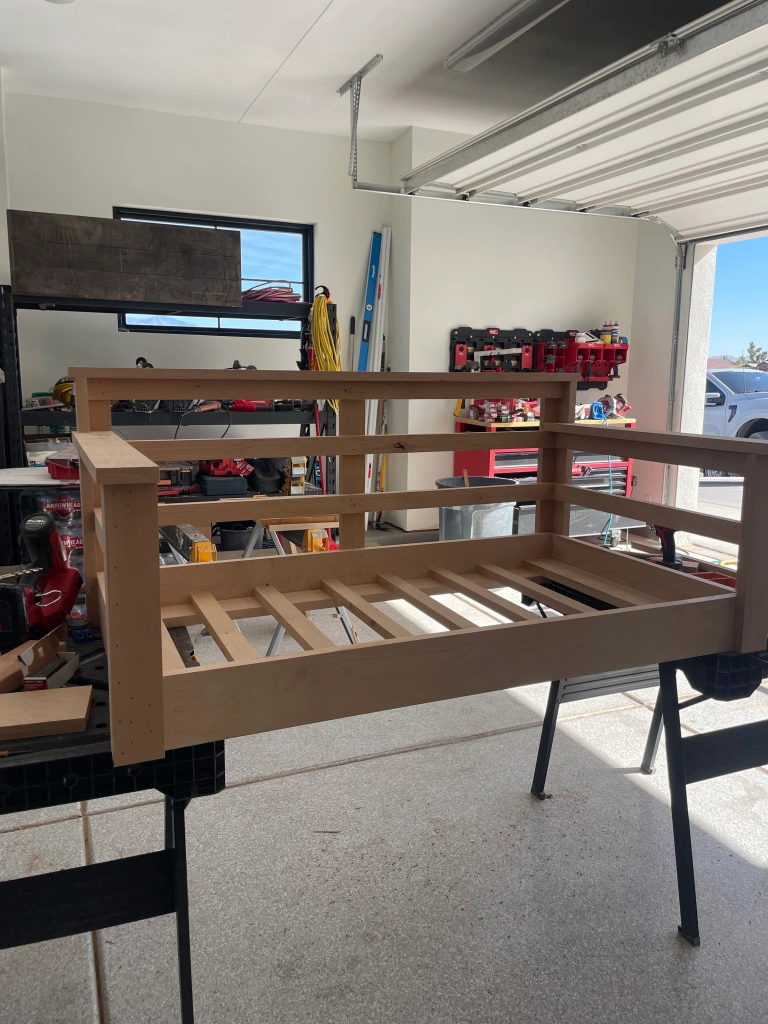
Step 2-Now that we got the frame done we need to add the slats in between to help support the cushion/seating. First we want to add the railing against the longer sides of the frame. You want to add two 2 1/2in pockets on both ends of each 1x5x52 1/2in board and 5-6 pockets on one side of the board. Then screw you board on the bottom/underneath of the seat of the frame.
Step 3:
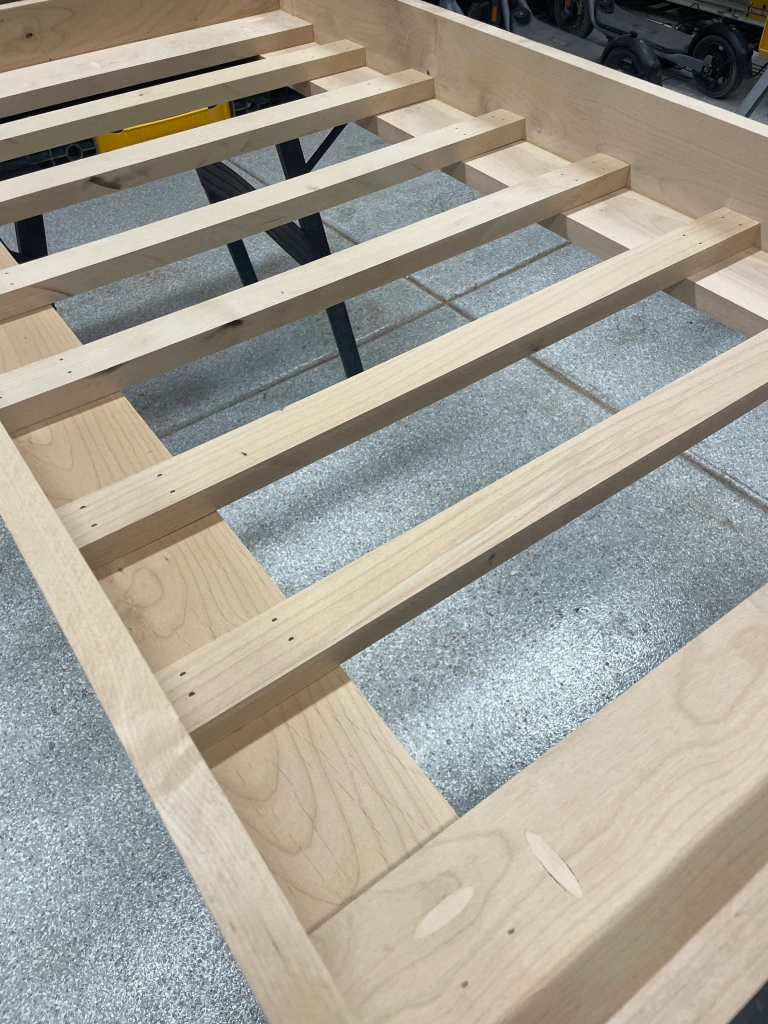
We can add the outer slats in at this point now. We decide to do a thicker piece on the edges just to give that extra support but you can totally just do 2in pieces the whole way. Just skip to step 4 then. Otherwise the outer 1×5@28 1/2 pieces you will need to put pocket holes in again. This might be overkill but we wanted to be safe with that extra strength and support because who knows who will be sitting on the porch swing. The pocket holes were placed on top, two on the ends and three on one side of the board. We used wood plugs again to fill them because we didn’t want the cushion to get caught in the exposed holes and ruin the cushion.
Step 4:
You can add your (6) 1x2x28 1/2 pieces in now. Just evenly space them out and glue and nail with 1 1/2 finish nails.
Step 5:
At this point I would recommend adding you bottom boards that will be the support to your rope. We did it after the bench was completed and that’s fine but the only reason why I would do it not is because I changed the leg lengths for you to cover that board up front ad give a cleaner look.
Center you board on the frame so you have the same amount on each side overhanging. You want to add the board flush with the frame. Nail in your board with 1 1/2in finish nails. You can also use 2 or 2 1/2in finish nails where the rope board and frame board meet on the edge as well.
Once those are in place, you can use a 1in whole sale to cut your holes for the rope.
Step 6:
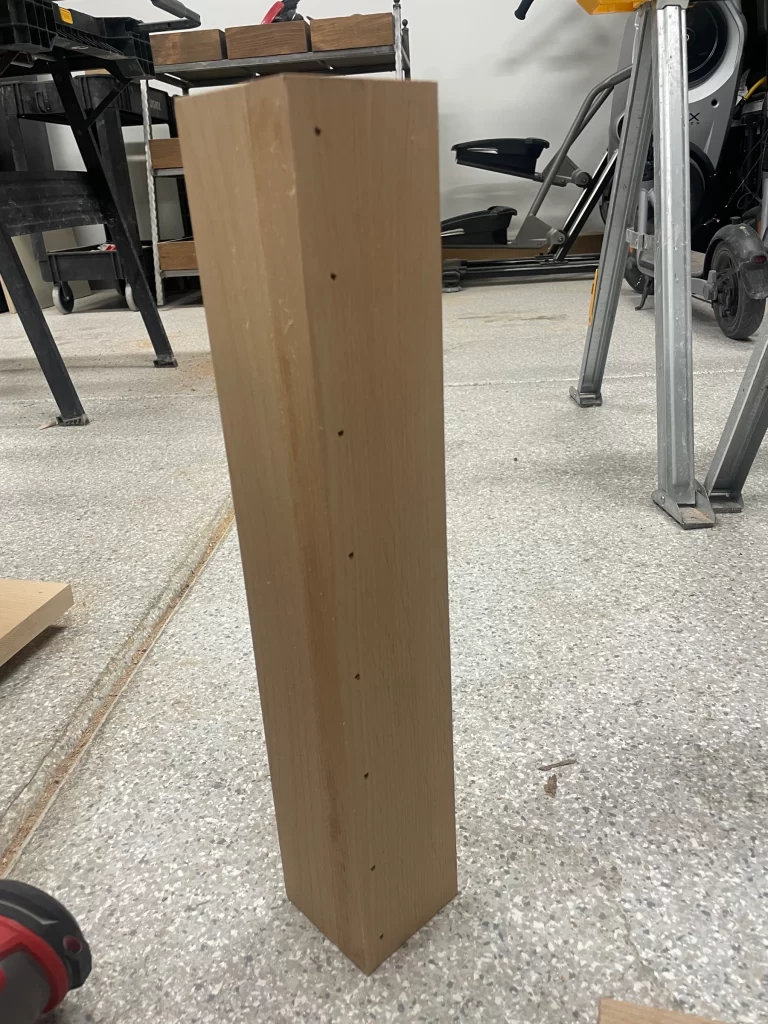
To start with the sides of the bench, you want to start with building the legs or posts for the bench. The pictures below is what we did but I changed that the legs part in the front and the back on the bench are a little longer to cover the bottom rope support board. Hopefully that makes sense.
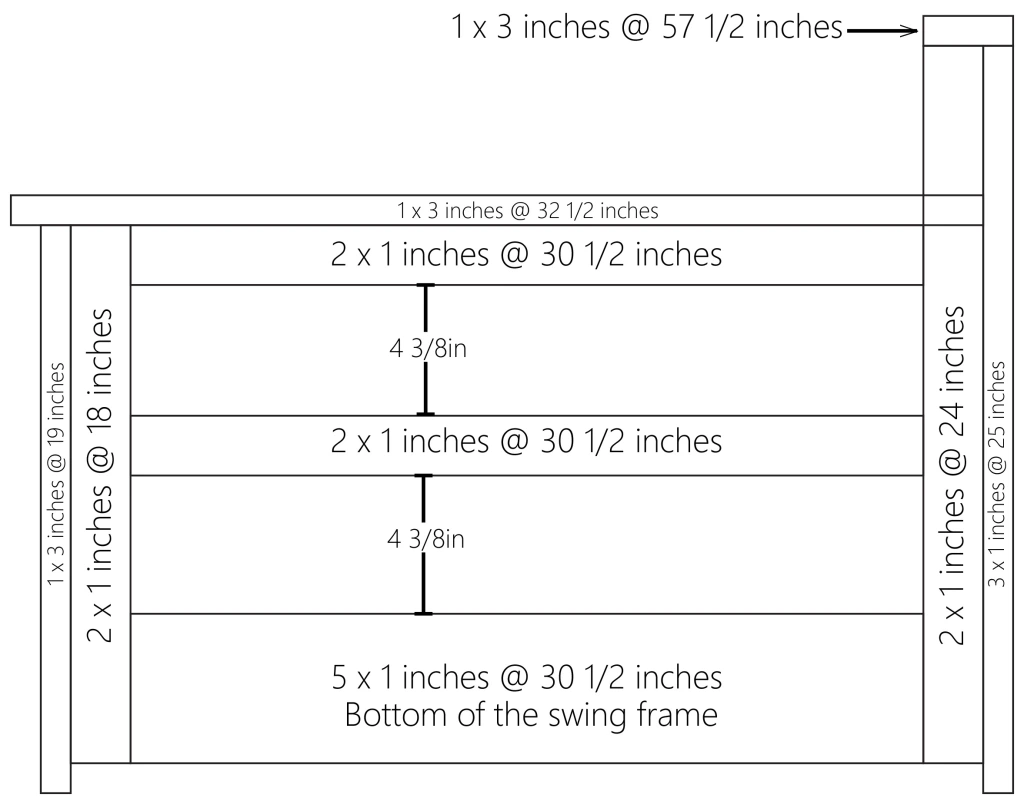
Get your (2) 1×3@19in and (2) 1×2@18in and nail with 1 1/2 or 2in finish nails one of each boards together. You want the two boards to be flush with each other to give that nice smooth seamless look. Make sure the 1×3 is in the front and the 1×2 on the sides of the bench. The 19in piece will be slightly longer, so just make sure the tops of the legs are flush with each other.
Next your going to do the same with your (2) 1×2@24in and (2) 1x3x25in.
Now that your “legs” are put together you can add these to the frame with 1 1/2in finish nails. The shorter legs will be on the front of the frame/seat and the longer legs will be on the back of the frame/seat.
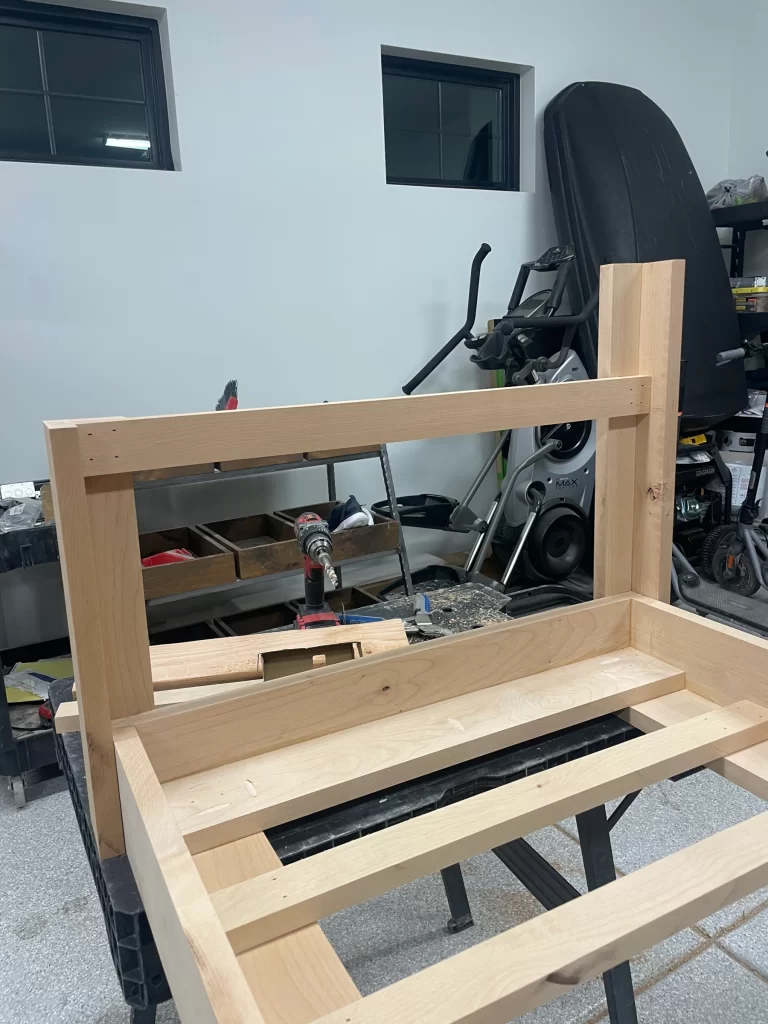
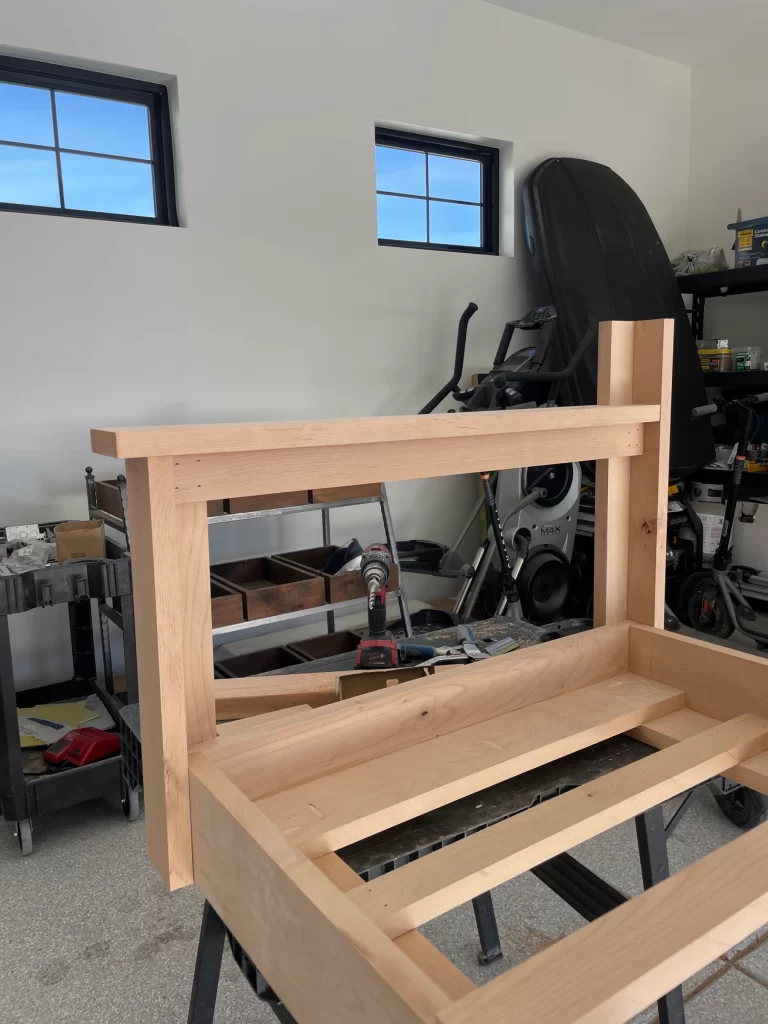
Step 7:
Step 7-The easiest way to add the arm and rails to the sides are to add the top rail first with your 1×2@30 1/2in piece so you have your arm board to have support. Have the arm flush to the top of the front leg and make sure it it level when nailing to the back leg with 1 1/2 nails.
At this point you can add your middle rail 1×2@30 1/2in piece center between the frame board and the top rail.
Step 8:
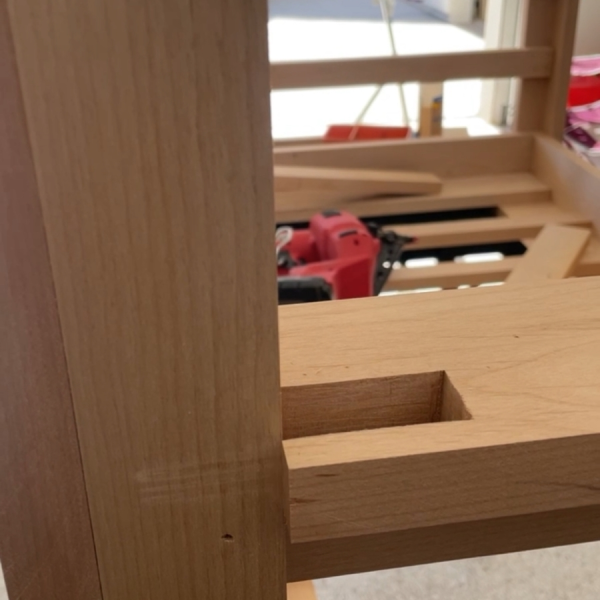
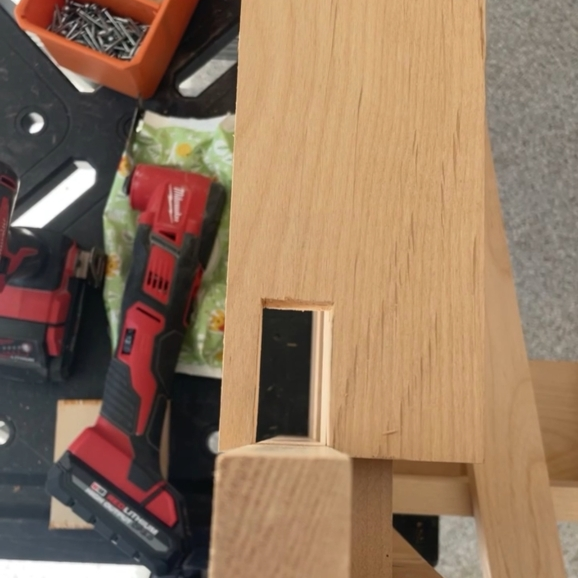
Lastly, you can add the arm rest (1) 1×3@32 1/2in board with 1 1/2in finish nails. We used a jigsaw to cutout the little piece for the arm board to slide into. But if you want to avoid that, you can just cut the little piece off that would be showing on the outside of the bench. It’s just a personal detail.
Step 9:
Repeat steps 7 & 8 for the other side of the side of the bench.
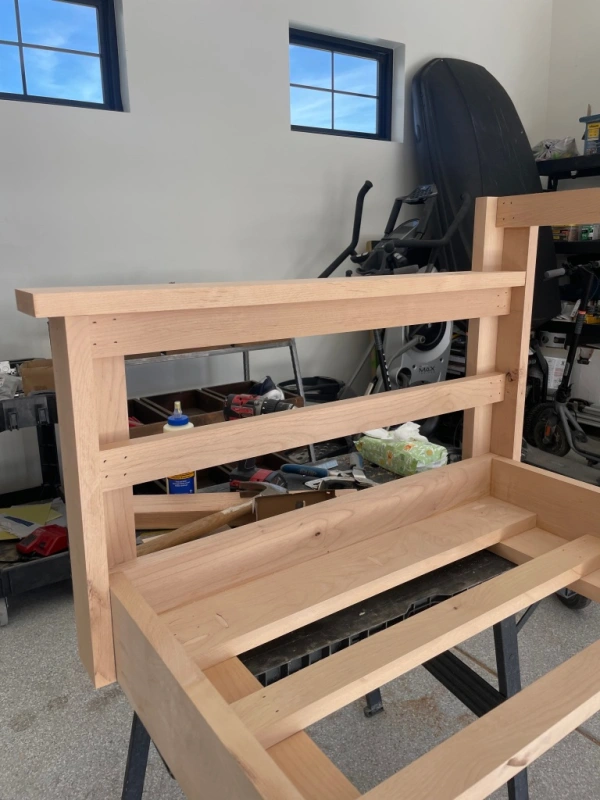
Step 10:
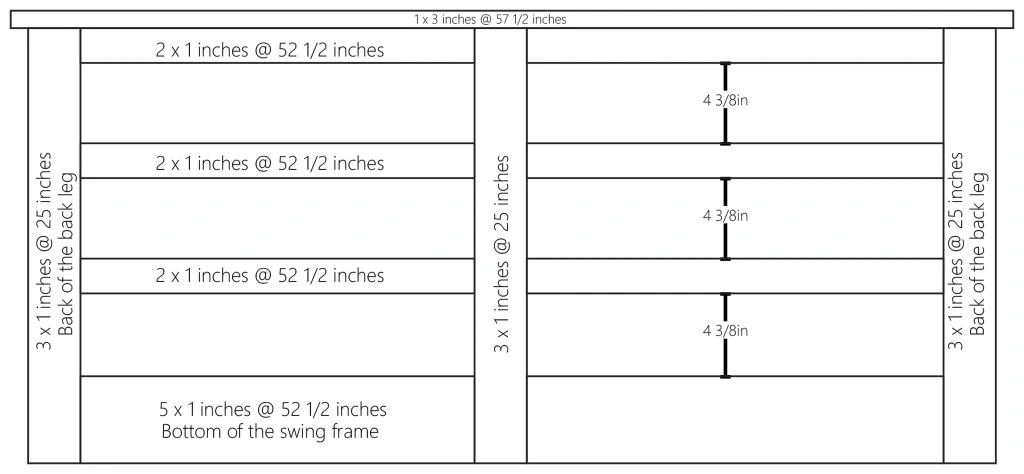
Finally made it to the back of the bench. It’s basically going to be the same steps you did with the sides of the bench but with longer boards. Start with the top rail (1) 1×2@52 1/2in board and nail into the back leg with 1 1/2in finish nails.
Add you (2) 1×2@52 1/2in rail boards and have them line up with your side rail boards. Nail with 1 1/2in finish nails.
Next add you top trim 1×3@57 1/2in board on top of the top rail board. It will hung over about an inch on each side. Nail into the top rail piece with 1 1/2in finish nails.
Lastly you can add you back support 1×3@25in board. You want to center this board on the back and nail with 1 1/2in finish nails.
Add that’s that. I know it might seem like a lot and a lot within each step but honestly it’s not that bad of a project. Just take your time in building it and always measure twice before you cut.