DIY Projects
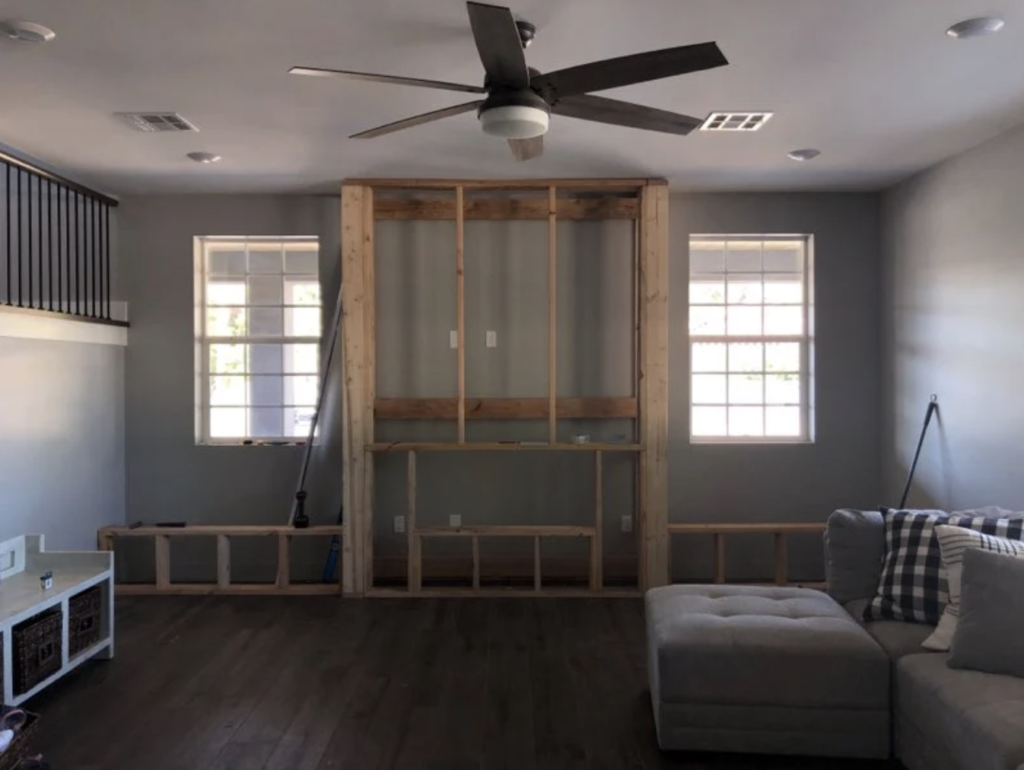
DIY Living Room Fireplace
"One Day at a time, One project at a time"
Make your living room more cozy and relaxing with this DIY Project!
Items you’ll need:
Fireplace Rough Box
- (3)2×4 @ 73in-measure and cut to fit
- (6) 2×6 @ 73in-measure and cut to fit
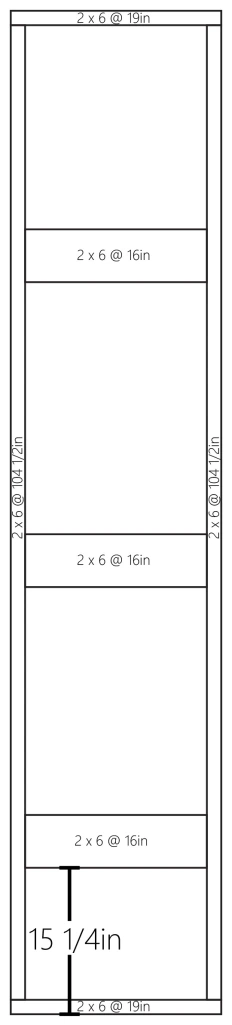
- (2) 2×6 @ 104 1/2in-measure and cut to fit
- (2) 2×6 @ 19in-measure and cut to fit
- (3) 2×6 @ 16in-measure and cut to fit
- (4) 2×6 @ 63 3/4in-measure and cut to fit
- (3) 2×6 @ 22 1/2in-measure and cut to fit
- (4) 2×6 @ 36 1/4in-measure and cut to fit
- (4) 2×6 @ 14 1/4in-measure and cut to fit
- (1) 2×6 @ 47 1/4in-measure and cut to fit
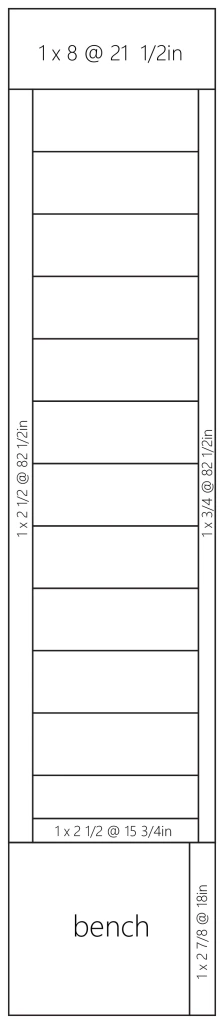
Fireplace Finish Trim
- (3) 4×8 sheets 7/16 OSB
- (17-20) 1/2in x 7 1/4in x 8ft Primed Pine Shiplap
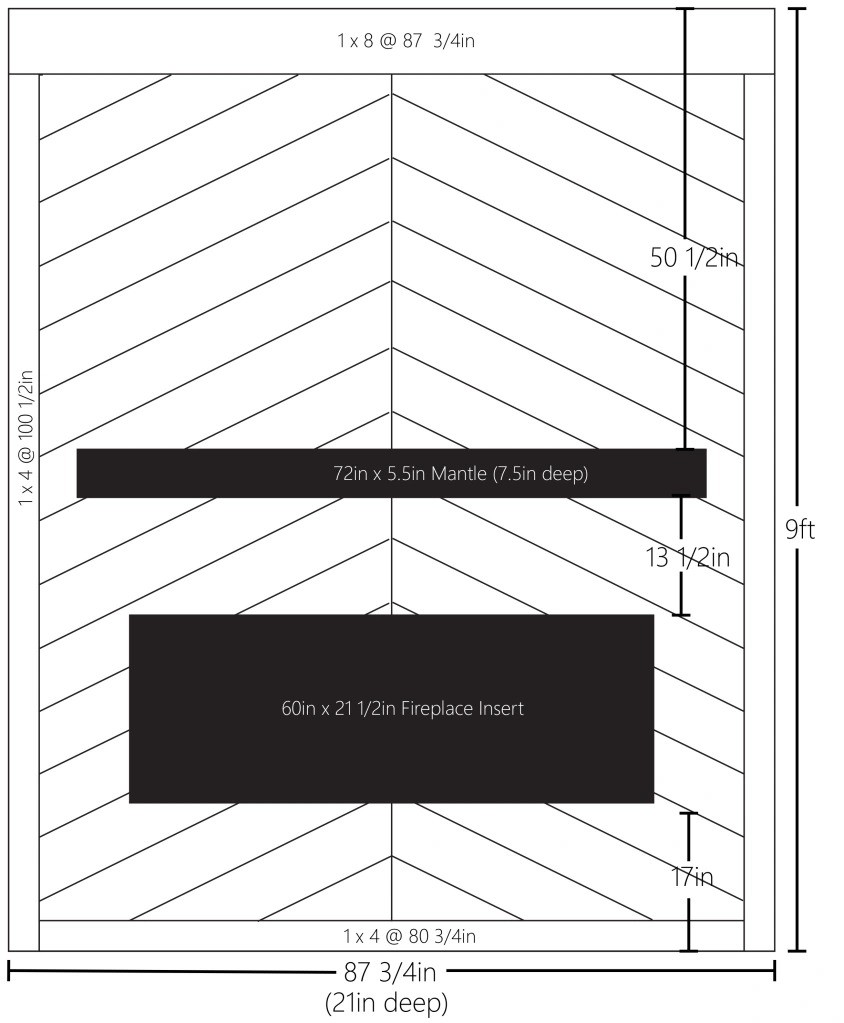
- (2) 1x4in @ 100 1/2in Select Pine or any Hardwood-measure and cut to fit
- (1) 1x8in @ 87 3/4in Select Pine or any Hardwood-measure and cut to fit
- (1) 1x4in @ 80 3/4in Select Pine or any Hardwood-measure and cut to fit
- (2) 1×2 1/2in @ 82 1/2in Select Pine or any Hardwood-measure and cut to fit
- (2) 1×2 1/2in @ 15 3/4in Select Pine or any Hardwood-measure and cut to fit
- (2) 1×1 3/4in @ 82 1/2in Select Pine or any Hardwood-measure and cut to fit
- (2) 1×2 7/8in @ 18in Select Pine or any Hardwood-measure and cut to fit
- (2) 1x8in @ 21 1/2in Select Pine or any Hardwood-measure and cut to fit
Benches (for both benches, if you only want to do one bench divide quantity in half)
- (4) 2×4 @ 62 3/4in-measure and cut to fit
- (4) 2×6 @ 62 3/4in-measure and cut to fit
- (10) 2×6 @ 14in-measure and cut to fit
- (6-8) 2×4 @ approx 13in-measure and cut to fit
- (2) 4×8 sheet 3/4in Sanded Pine or Birch Plywood
- (4) 1×2 1/4in @ 62 3/4in Select Pine or any Hardwood-measure and cut to fit
- (6) 1×2 1/4in @13in Select Pine or any Hardwood-measure and cut to fit
- (4) 1×2 1/4in @ approx. 28in Select Pine or any Hardwood-measure and cut to fit
- Wood Filler
- Wood Glue
- Electric Sander (optional)
- Paint Sprayer (optional)
- 120 or 220 grit Sandpaper
- Table Saw
- Circular Saw (optional)
- Miter Saw
- Finish Nail Gun
- Drill
- Level
- 1 1/4in Finish Nails
- 2-1/2in self tapping wood screws (we used SPAX)
- Hammer
- Nail Punch
- Painters Caulk
**If you don’t want to add the benches at all, just adjust some of the measurements and cover up the bench space with OSB and shiplap.
**Also we have 9ft ceilings. Adjust the length to your ceiling height, if you have 8ft or 10ft & up. You can also adjust the wide of the fireplace if you like. Just make sure you double check your electric fireplace insert (I have a 60″ Electric Fireplace Insert).
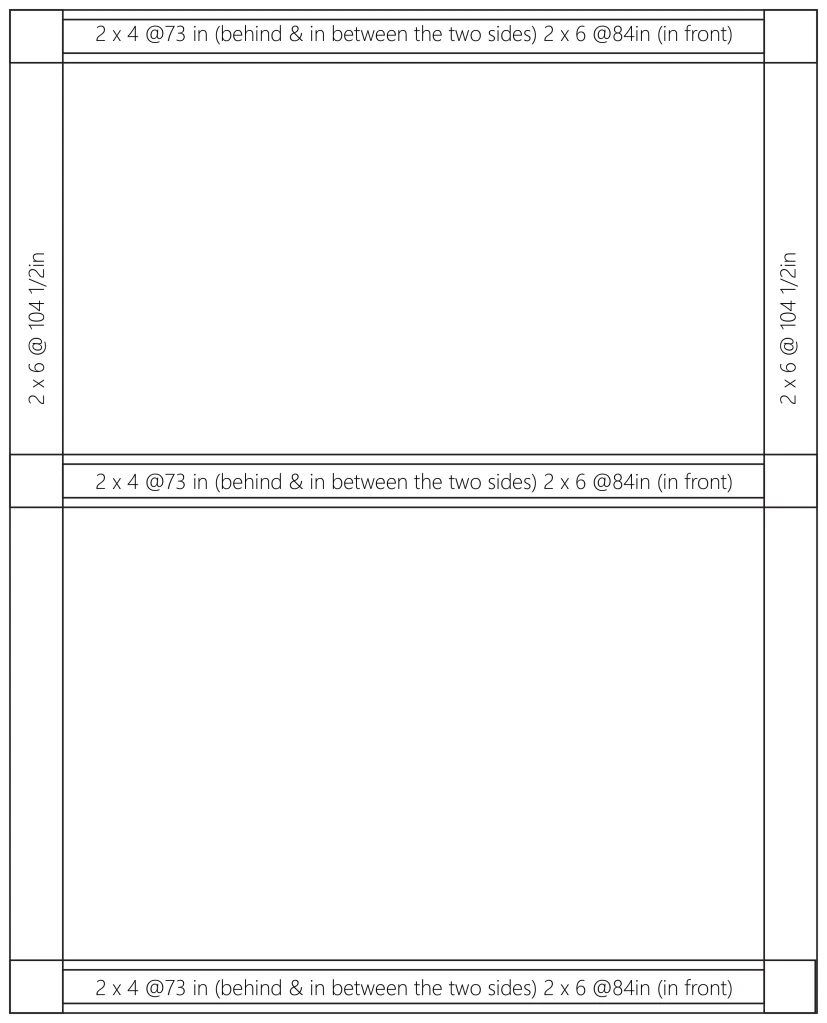
Fireplace Step 1-We would start building the back brace of the fireplace rough trim. Follow the photo above to lay out. Screw your middle pieces of wood (2x4s) making sure you hit the studs within your wall.
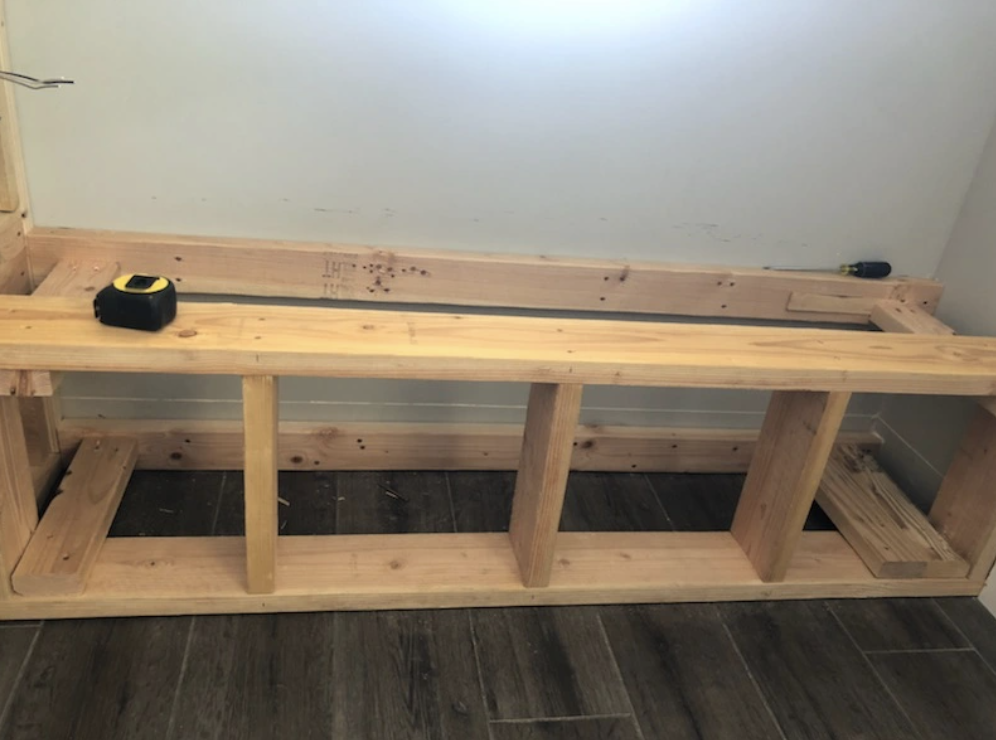
Fireplace Step 2-Next you want to build your sides. Making the box of the sides (don’t add the middle braces to the sides yet), and placing them next to the 2x4s on the wall. After that you want to attach your 2x6s in front of your 2x4s and in front of the back of your side pieces with screws. Now you can add your middle pieces within the side walls. But sure you have your bottom middle piece at the suggested height (to attach the benches) the other two don’t matter. If your not doing the benches then placed them wherever you like. This just helps to sturdy up your fireplace.
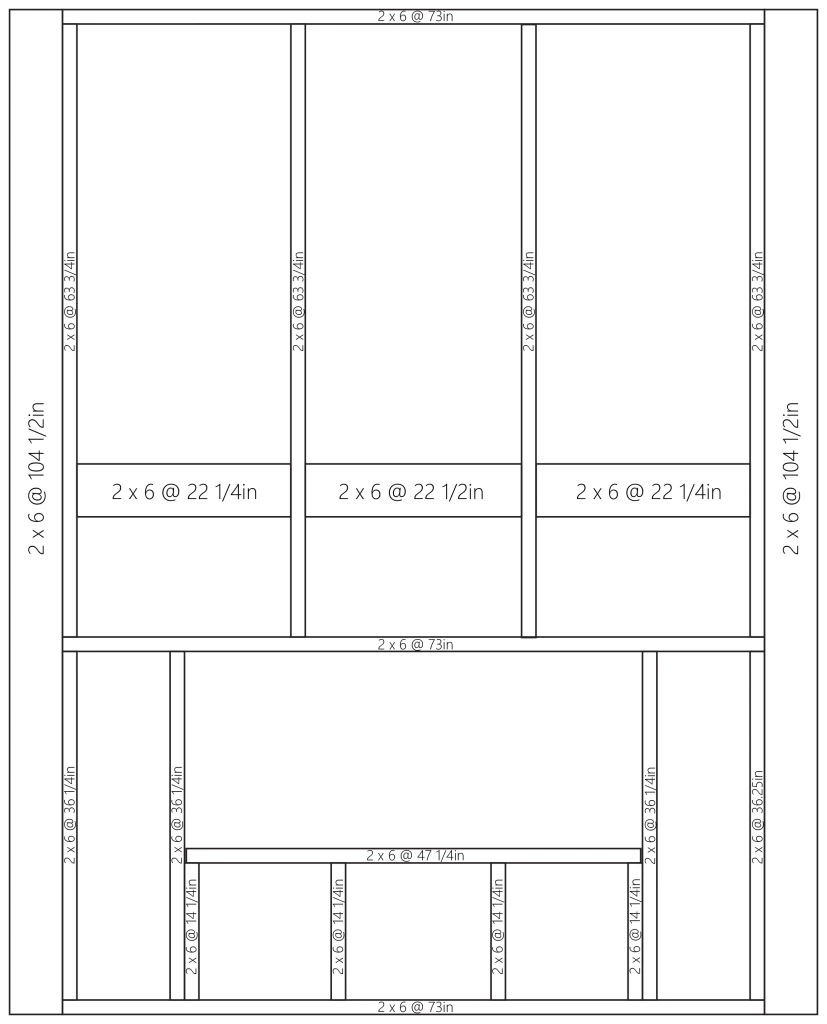
Fireplace Step 3-Lastly, you want to build the front. We build the bottom half first and then the top half. Start with your 2×6 @ 47 1/4 in piece and add the smaller pieces beneath., making the two edges flush with the top piece. The two smaller middle pieces can be spaced evenly between the other two. Then add your other pieces and attach to the bottom floor piece (2×6 @ 73in). It’s best to lay it all out and then start attaching. You can add the top fireplace insert piece (2×6 @ 73in) on.
Fireplace Step 4-Build your top half. Lay it on the floor and screw from the top. It will look like a big fork head. Have two people lift and put it in place. Use your hammer if it’s a tight squeeze. Screw everything together (to the sides and the bottom half of the front).
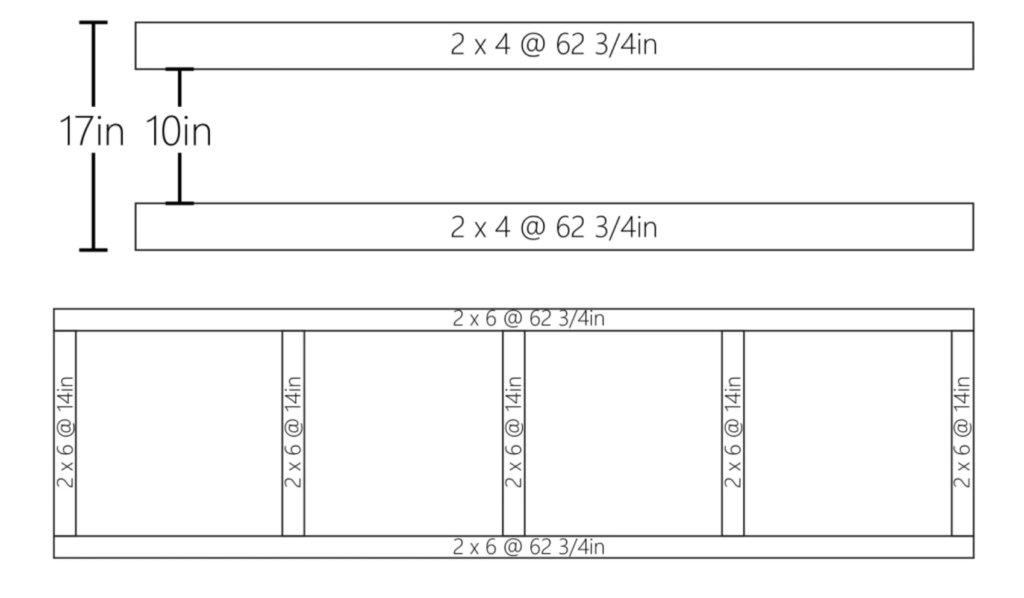
Benches Step 1-Attach your back 2×4 to the wall. Make sure you screw into your studs of the wall.
Benches Step 2-Build your fronts but placing your pieces on the floor and screwing your top and bottom pieces to the middle pieces. Place your front pieces at 15 in from the wall or 13 1/2 from the 2×4 in the wall. Attach the front and back pieces using your some 2×4 pieces in the middle on the top and bottom to sturdy it up. On the side of the bench attaching to fireplace, attach from the inside of the fireplace to the bench. Don’t be afraid to go overboard on the how many screws you’re using on this whole project. The more the merrier.
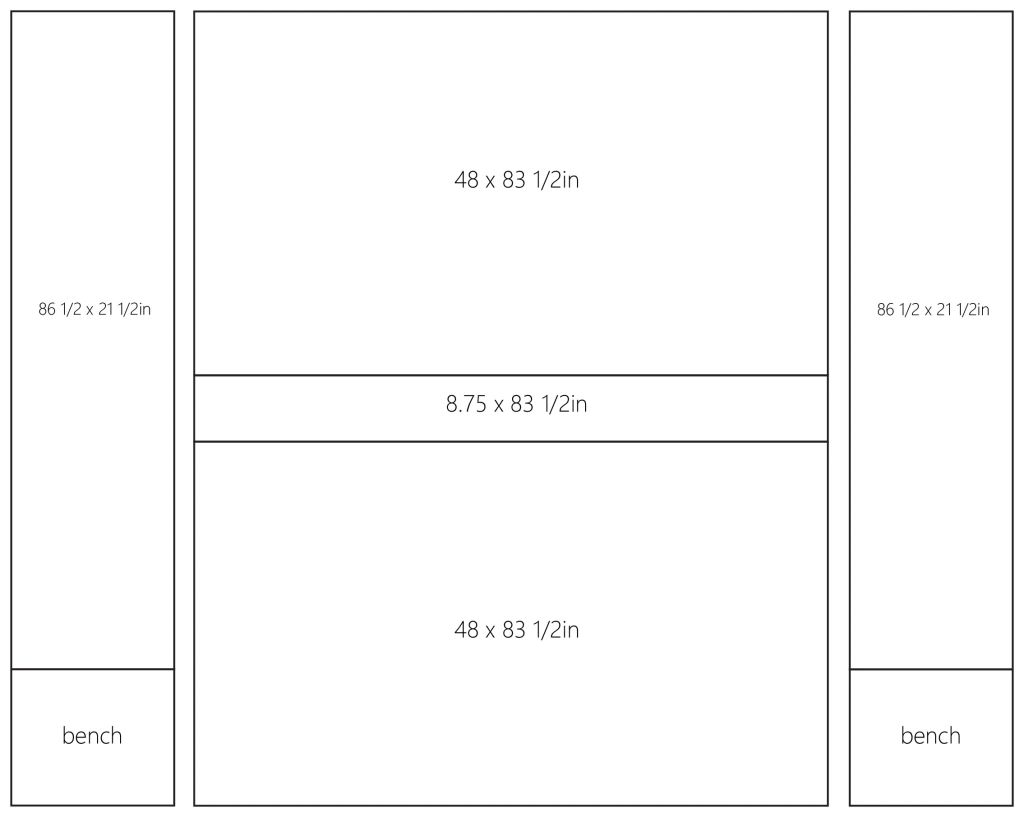
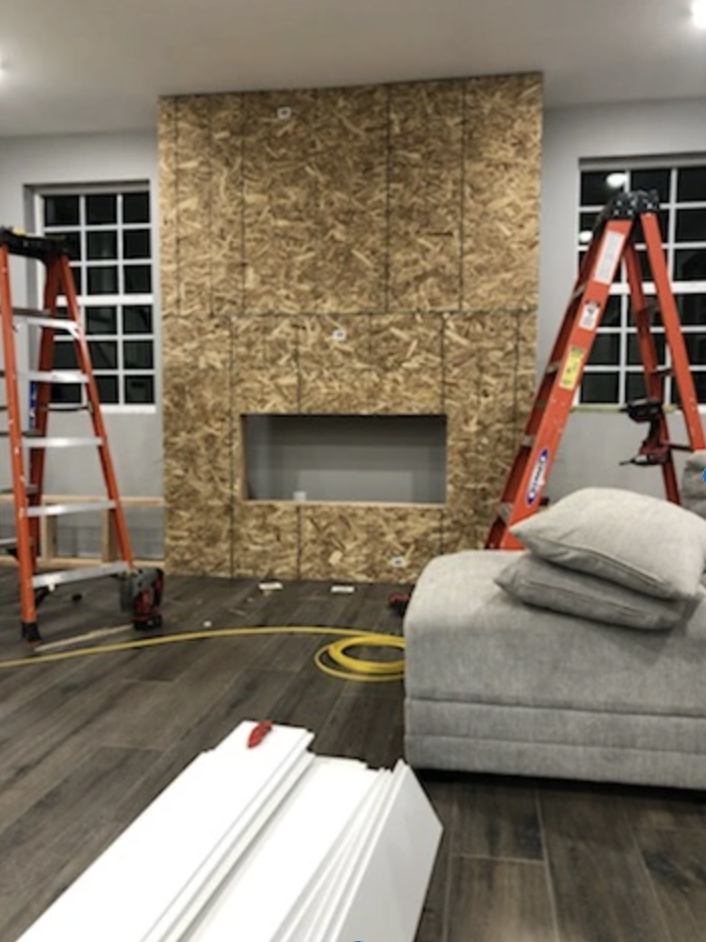
Fireplace Step 5-You can to sheet the whole fireplace with OSB. Follow the above photo to help with measurements. Its best to cut your two big pieces int he front and screw those in first and then cut the middle in case you need to adjust the size. The OSB doesn’t need to be perfectly cut. This just help to attach the shiplap on to something and it will get covered anyways. Attach your sides with screws.
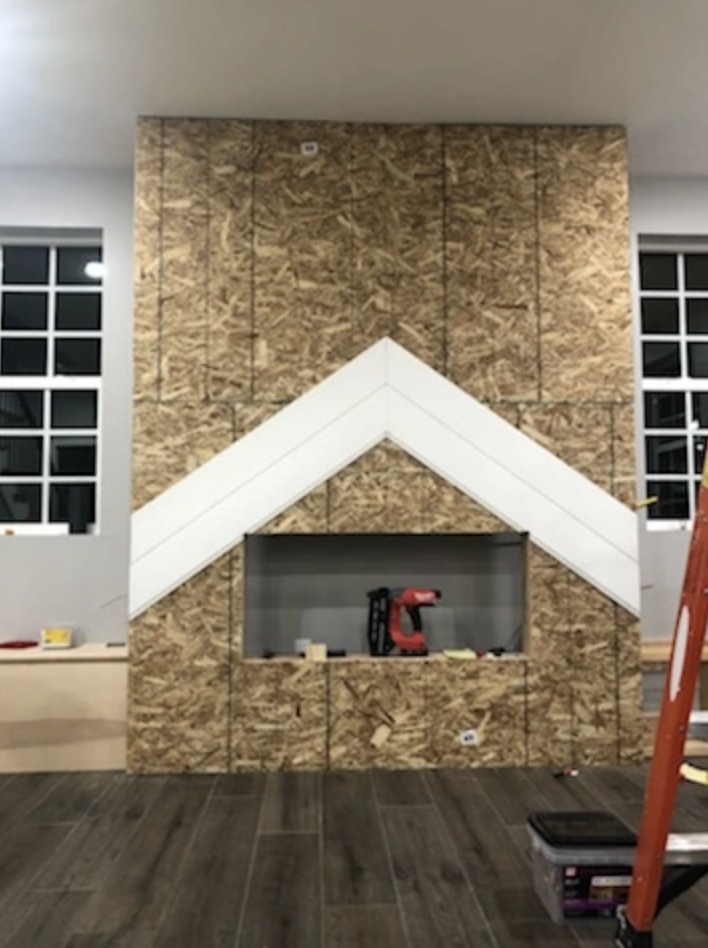
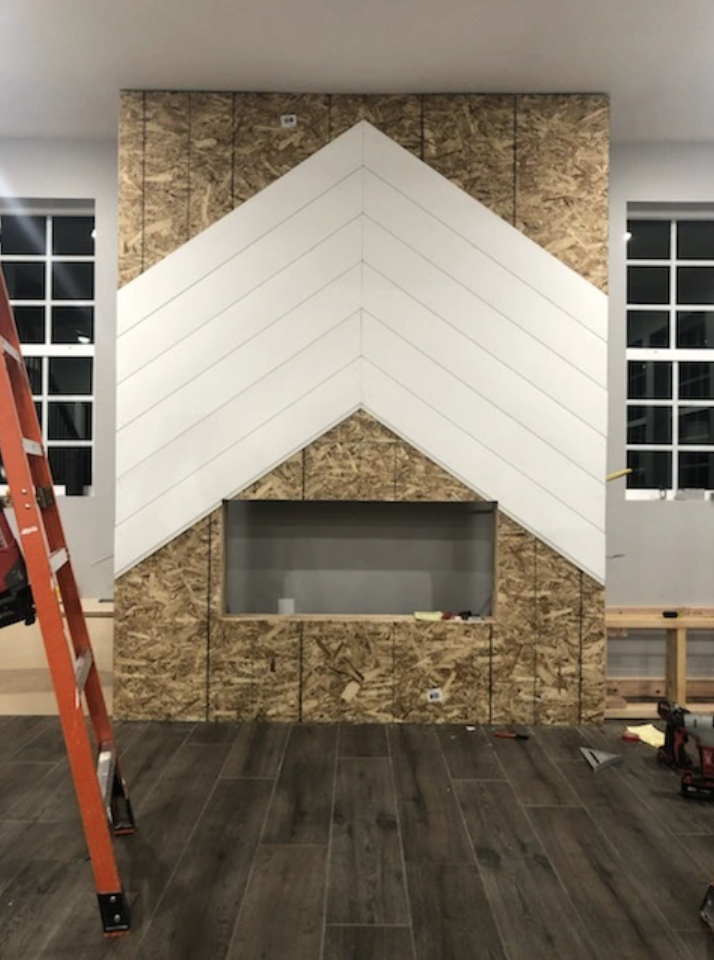
Fireplace Step 6-Next is the shiplap. If you want to just do a straight shiplap then start with the bottom and work your way up. When you get to the sides of your insert make sure they line up before moving on the the next row. Use your level and be sure to glue every piece of shiplap and nail in with your finish nails. If your doing the “V” look I recommend starting with the pieces right above the insert. Find your center of the OSB and that is your center line of the shiplap. You might need to figure out the angle cuts yourself. We had to figure it out and once we got the first one down it was pretty similar with each board. Just be careful and take it slow. Once we got the right “V” angle we wanted, we nailed in the OSB. We worked our we way up and after that we work our way down from the first pieces we placed. Just because their are a lot of cuts on the bottom half. Remember your going to cover the sides and top and bottom with trim so if your short a little don’t worry.
Fireplace Step 7-Next shiplap the sides. These pieces I would cut at 16 1/2in. at least. Starting from the bottom (top of the bench) working your way up.
Benches Step 3-Sheet your benches with the sanded pine or birch plywood with finish nails. The top being cut at approx. 16 1/2 x 62 3/4in and your front being cut at approx 17 3/4 x 62 3/4in.
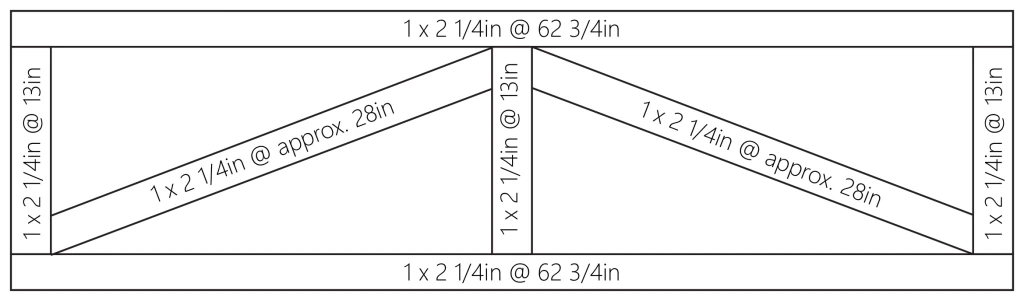
Benches Step 4-Lastly, trim your bench out using glue and finish nails. Start with the top and bottom pieces. You want to make sure your top piece of the front is flush with the top plywood (the one where you seat on). Next attach the two sides. From the center of the front and attach your middle piece and the two angled piece. If your angle pieces have a little gap you can fill it with wood filler or caulk.
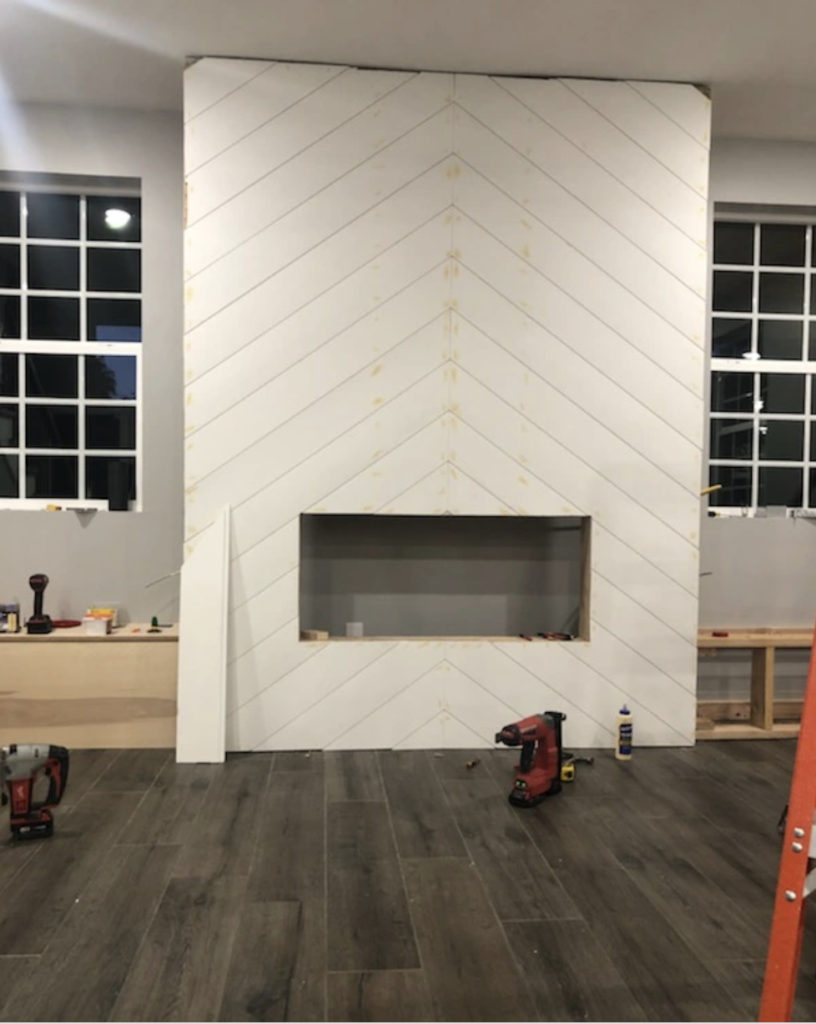
Fireplace Step 8-Lastly, trim your fireplace out using glue and finish nails. Start with the bottom piece on the front and the top header. Add the sides of the front and then do the same with the side walls of the fireplace.
Now you can nail punch any nails in, fill all the holes with wood filler, sand your whole project, caulk are the trim pieces and any pieces that are touching the ceiling and other walls and paint.
We hang our mantle from the inside of the fireplace. Do this first before you install your electric fireplace insert. We drilled some holes into the inside of the fireplace and used four 8in lag bolts and washers to hold the mantle from the inside. Giving that mantle a floating mantle look.